
A cable tie is one of the simplest fasteners ever made, and also one of the most misused. It is a thin strip of nylon with teeth on one side and a small locking head on the other. You thread the tail through the head, pull it tight, and the tie locks in place. It takes five seconds. Yet anyone who has cut a cable tie too short, crushed a network cable by pulling too hard, or tried to undo a tie that was never meant to be undone knows that the five-second job has a right way and a wrong way. This guide to cable ties how to use covers the right way: choosing the right tie, fitting it step by step, trimming it cleanly, removing it safely, and avoiding the mistakes that damage cables and equipment.
Cable ties are also called zip ties, and the two names mean the same thing. Electricians, network installers, mechanics, gardeners, and home organisers all use them, because a bundle of loose cables is a trip hazard, a fire risk, and a mess to work on. A well-fitted cable tie turns that mess into a neat, labelled bundle that is easy to trace and easy to change later.
What Cable Ties Are and How They Work
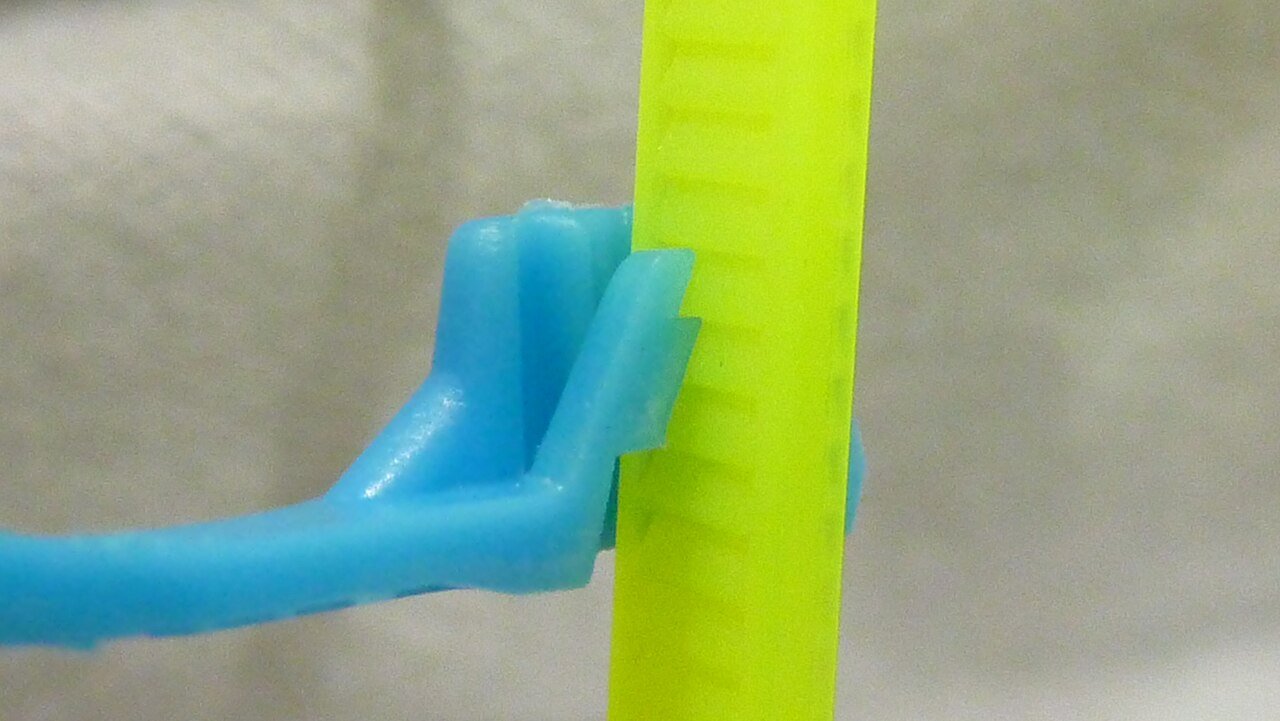
A standard cable tie has three parts: the head, the strap, and the tail. The head is a small square block with a slot through it and a tiny flexible pawl inside. The strap is the long flat band, with small ridged teeth moulded along one side. The tail is the pointed end of the strap, which makes it easy to thread through the head.
When you push the tail through the head, the pawl rides over the teeth. The teeth are angled so that the strap can slide forward through the head but cannot slide back. That one-way action is the whole secret of the cable tie: it can only get tighter, never looser, unless you cut it or release the pawl. Anyone learning cable ties how to use basics should start by understanding this lock, because it explains every other rule that follows. The harder you pull, the tighter the loop becomes, and the pawl locks against the nearest tooth to hold the tension.
If you want to understand the mechanism in more detail, the guide on how cable ties work explains the locking head, the pawl, and the teeth with clear diagrams. Knowing how the lock works matters, because it explains why a tie cannot be undone by pulling, why cutting the tail too close to the head weakens the lock, and why a tie that has been pulled past its limit will snap rather than stretch.
Most cable ties are made from nylon 6/6, a tough plastic that is strong, flexible, and resistant to chemicals and abrasion. Standard nylon ties are for indoor use. Black ties are usually UV-resistant and suit outdoor use, because sunlight breaks down ordinary white nylon over time. Stainless steel ties are used where heat, chemicals, or extreme strength are involved, such as in engine bays and industrial plants. Releasable ties have a small lever on the head that lifts the pawl, so the tie can be opened and used again.
Cable Ties How to Use Them Step by Step
The basic method is the same whatever you are fastening. Follow these steps in order, and the tie will hold firmly without damaging what it holds. This is the core of cable ties how to use guidance, and it works the same way for a desk setup or a server cabinet.
First, gather the cables or items you want to bundle, and arrange them so they lie flat against each other with no twists. A twisted cable inside a tight bundle will press against its neighbours and can wear through its insulation over time. Straighten the bundle, and if the cables are different lengths, line up the ends you want to keep together.
Second, choose a tie that is long enough. The tie needs to wrap around the bundle with at least a few centimetres of tail left over after it passes through the head. If the tail is too short to grip, you cannot pull the tie tight. As a rough guide, the tie should be at least twice the diameter of the bundle plus a hand-width of extra length. When in doubt, use a longer tie and trim the excess afterwards. Getting the length right is a small part of cable ties how to use them well, but it saves a wasted tie every time.
Third, thread the tail through the head. Hold the head in one hand with the teeth facing the bundle, and push the pointed tail through the slot. Pull the tail through until the loop is loose around the bundle. Make sure the teeth are on the inside of the loop, facing the cables, because the pawl in the head can only grip the teeth if they are on the correct side. If the tie slides freely back and forth, you have threaded it with the teeth facing out, so turn it over and try again.
Fourth, position the tie where you want it, then pull the tail steadily with one hand while holding the head still with the other. Pull smoothly, not in jerks. You will hear a faint clicking sound as the pawl rides over the teeth. Stop when the loop is snug against the bundle. The bundle should hold together firmly, but you should still be able to slide a fingernail between the tie and the cables. If the cables are pinched or flattened, you have pulled too hard, and you should cut the tie off and start again with a fresh one.
Fifth, trim the excess tail. Use flush cutters or sharp scissors, and cut the tail as close to the head as you can without nicking the head itself. A tail that sticks out by more than a few millimetres is a sharp edge that will scratch hands and snag clothing. Cut straight across, and run your finger over the cut end to check that it is smooth. If it feels sharp, trim it again or file the edge lightly.
Learning cable ties how to use them properly is mostly about that fourth step: the right tension. Too loose, and the bundle falls apart. Too tight, and you crush the cables. With a little practice, your hands learn the right pull, and the job becomes quick and reliable.
Choosing the Right Cable Tie for the Job
Not all cable ties are the same, and choosing the wrong type is the most common reason a tie fails. The three checks below are the whole of cable ties how to use decision-making before you fit a tie. The three things to check are length, strength, and material.
Length is the simplest. Cable ties are sold in lengths from about 100 millimetres up to a metre or more. Measure the bundle, add slack, and pick a tie that leaves a workable tail. A tie that is far too long is not a problem, because you trim the excess, but a tie that is too short is useless, so it is better to go one size up than one size down.
Strength is rated as tensile strength, which is the pulling force the tie can take before it breaks. Light ties are rated for small bundles of thin cables, such as a few charging leads behind a desk. Medium ties suit household and office wiring. Heavy-duty ties are for thick bundles, outdoor fixings, and loads that pull on the tie, such as hanging a cable along a fence. If the tie will carry weight, check the rating and choose one with a comfortable margin, because a tie that is loaded close to its limit will creep and loosen over time.
Material is where the environment matters. Standard white nylon is fine indoors, in dry conditions, at ordinary temperatures. Black UV-resistant nylon is the right choice outdoors, because ordinary nylon becomes brittle after months in sunlight. Heat-stabilised nylon suits hot places such as lofts and engine compartments. Stainless steel ties are for the harshest conditions: high heat, corrosive chemicals, and places where a plastic tie would melt or degrade. Releasable ties are the right choice when you expect to open the bundle again, for example on a temporary installation or a cable run that changes often.
Colour can also be a tool. Using a different colour for each bundle makes it easy to identify cables at a glance. Many installers use black for power, white for data, and a bright colour for anything temporary. That kind of simple system saves time the next time someone has to trace a cable through a crowded cabinet.
Cable Ties How to Use Them for Cable Management
Cable management is the most common use for cable ties, and it is where good technique makes the biggest difference. Good cable ties how to use technique shows most clearly in a tidy bundle, so this section is worth reading in full. The goal is a bundle that is neat, labelled, and easy to service.
Start by separating the cables into groups that make sense: power in one bundle, data in another, and anything you expect to move or replace in its own bundle. Mixing power and data cables in the same tight bundle can cause interference in sensitive signals, and it makes both groups harder to work on.
Space the ties evenly along the run, about every 15 to 30 centimetres for a horizontal run, and closer together where the bundle turns a corner or hangs vertically. A bundle that is tied in only one place will sag and pull on the connectors at each end. Several ties spread along the run share the load and keep the bundle straight.
Leave a little slack in the cables between ties. A cable that is pulled dead straight between two ties puts strain on its connectors, and it has no room to move if the equipment is shifted. A gentle curve between ties is a sign of a well-made run, not a sloppy one.
Label the bundle if it matters. A small flag label on one cable, or a coloured tie at each end of the run, tells the next person what the bundle is for. That matters most in server cabinets and home media setups, where a dozen identical black cables can look exactly the same from the front.
Finally, think about the next person who will open the bundle, even if that person is you in six months. Use releasable ties on anything you expect to change, and do not bury a connector in the middle of a bundle where it cannot be reached. A tidy bundle that cannot be serviced is worse than a loose one, because the next change will mean cutting every tie and starting over.
Common Mistakes When Using Cable Ties
Most cable tie failures are not caused by the tie. They are caused by the person fitting it, and the same mistakes appear again and again. Every mistake below is one that experienced installers still make, which is why cable ties how to use guides repeat them so often.
The first mistake is pulling too hard. A cable tie can crush a network cable or a fibre optic cable with very little effort. The copper wires inside a network cable are thin, and the glass inside a fibre cable is fragile. A tie that has flattened the cable jacket has already damaged the cable inside, even if it still works today. Pull until the bundle is snug, then stop. If you are using a cable tie gun, set the tension low and test it on a spare cable first.
The second mistake is cutting the tail too long, or too close. A long tail is a sharp spike. A tail cut flush against the head is safe, but a tail cut so close that it nicks the head can weaken the lock. Use flush cutters and cut straight across, a millimetre or two from the head.
The third mistake is using an indoor tie outdoors. A white nylon tie left in sunlight will go brittle within a season, and it will snap the first time someone touches it. If the tie is outside, or in a sunny window, use a black UV-resistant tie, or a stainless steel tie if the conditions are harsh.
The fourth mistake is using one tie where three are needed. A single tie in the middle of a long bundle lets the ends droop, and the drooping ends pull on the connectors. Spread the ties out, and the load is shared.
The fifth mistake is tying different things together. Power cables and data cables, hot pipes and cold cables, a cable and a sharp metal edge: each of these pairings creates a problem that a tidy-looking bundle hides. Keep different kinds of runs apart, and put a sleeve or a grommet between a cable and any sharp edge it touches.
How to Remove and Reuse Cable Ties
A standard cable tie is not meant to be undone, but it can be removed safely, and in some cases reused.
To remove a standard tie, cut it with flush cutters or small scissors. Safe removal is an overlooked part of cable ties how to use them, because a careless cut damages the cables you were trying to protect. Cut the strap on the side of the loop, away from the cables, so the blade never touches the cables themselves. Cut the head off in one piece if you can, because a loose head is easy to find and throw away, while a small cut fragment can fall into equipment. Never cut a tie by pulling a knife towards the cables, and never use a Stanley knife on a bundle you cannot see clearly. If the bundle is tight, slide a thin piece of card between the tie and the cables before you cut, to protect the cable jackets.
To reuse a tie, you need a releasable one. Releasable ties have a small lever or tab on the head. Press the tab with your fingertip or a small screwdriver, and the pawl lifts off the teeth, so the strap slides back out of the head. The tie can then be used again. Releasable ties are slightly more expensive, but they pay for themselves on any job where the bundle changes often, such as a desk setup or a trade-show installation.
There is also a trick for undoing a standard tie without cutting it, which works in an emergency. Push a thin flat object, such as a pin or the tip of a small screwdriver, into the slot in the head to lift the pawl, and pull the strap back out at the same time. This usually damages the pawl, so the tie should not be trusted again afterwards, but it saves the cables when you have no cutters to hand. Do this only when you are sure you can see what you are doing, because the tool can slip and nick a cable.
Cable Ties How to Use Them Outdoors
Outdoor use adds three enemies: sunlight, water, and temperature change. Each one shortens the life of an ordinary tie, so outdoor jobs need a different approach. Outdoor work changes the rules, and cable ties how to use them outside means choosing the material first and the technique second.
Sunlight is the biggest enemy. Ultraviolet light breaks down the nylon in a standard tie, making it brittle. A tie that was strong in spring can snap in autumn after a summer in the sun. Black UV-resistant ties are made with carbon black mixed into the nylon, which absorbs ultraviolet light and protects the tie. They cost little more than standard ties and last far longer outside.
Water is the second enemy. Nylon absorbs a small amount of water, which is not a problem in itself, but repeated wetting and drying, especially with frost in winter, makes ties brittle over time. Stainless steel ties do not have this problem, and they are the right choice for fixings that must last for years in exposed places, such as holding a cable to a fence or a mast.
Temperature change is the third enemy. Nylon expands and contracts with heat, and a tie that is tight on a hot day can go slack on a cold night. If the fixing must stay tight through the seasons, use a stainless steel tie, or a heat-stabilised nylon tie rated for the temperature range of the location. Check the rating before you buy, because a tie that is fine in a loft in summer can fail in the same loft in winter.
When you fit a tie outdoors, leave the tail a little longer than you would indoors, and cut it cleanly, because a sharp tail in an outdoor fixing is a hazard for anyone who brushes past it. Fix the tie so the head sits on the sheltered side of the bundle where possible, so that rain runs off the head rather than pooling in the slot.
Safety Tips for Using Cable Ties
Cable ties are safe when they are used properly, but a few habits keep them that way. Safety is the part of cable ties how to use guidance that beginners skip, so read this section before your first outdoor job.
Always cut the tail flush, so there is no sharp point sticking out. A cable tie tail can scratch skin and snag clothing, and in a home with children or pets, a sharp tail at hand height is a small hazard that is easy to prevent.
Never use a cable tie as a substitute for a proper fixing where safety depends on it. A cable tie is not a replacement for a hose clamp, a load-bearing strap, or a seatbelt. It is a fastener for bundling and light fixing, and it should not be trusted with a load that could injure someone if it failed.
Do not use cable ties on anything that gets hot enough to soften nylon. Ordinary nylon softens at temperatures well below the point where metal fails, so a tie near a hot exhaust, a heater, or a halogen lamp can loosen without warning. Use a stainless steel tie, or a fixing made for high temperatures, in those places.
Keep spare ties away from children. A loose cable tie can be a choking hazard, and a loop of tie around a finger or a neck is dangerous. Store them in a box or a bag, not loose in a drawer where a child can reach them.
Finally, check your work. After you fit a tie, give the bundle a gentle tug to make sure the lock has caught, and check that the cables are not pinched. A thirty-second check at the time saves an hour of fault-finding later.
Frequently Asked Questions
Can you undo a cable tie without cutting it?
A standard cable tie is designed not to undo, but you can release it by lifting the pawl inside the head with a pin or a small screwdriver while you pull the strap back. The tie is usually damaged by this, so do not trust it again. Knowing the answer is useful, because cable ties how to use them confidently means knowing how to undo a mistake. Releasable ties are made to be undone and reused, and they are the better choice if you expect to open the bundle more than once.
How tight should a cable tie be?
Tight enough that the bundle holds together and does not slide, but loose enough that the cables are not flattened. A good test is to slide a fingernail between the tie and the cables. If you cannot get a fingernail in, the tie is too tight. If the bundle slides freely inside the loop, it is too loose. The fingernail test is the simplest cable ties how to use check there is, and it works on every size of tie.
What is the strongest type of cable tie?
Stainless steel cable ties are the strongest, and they resist heat, chemicals, and sunlight better than any plastic tie. Heavy-duty nylon ties are the strongest plastic option, and they are strong enough for most household, office, and garden jobs. The right choice depends on the load and the environment, not on strength alone.
Do cable ties work outdoors?
Yes, but only the right type. Use black UV-resistant nylon ties for general outdoor use, and stainless steel ties for fixings that must last for years in sun, rain, and frost. Standard white nylon ties go brittle in sunlight and should not be used outside. That is the short answer, and the longer version of cable ties how to use them outdoors is in the section above.
How do you stop a cable tie tail from being sharp?
Cut the tail with flush cutters, as close to the head as possible, and cut straight across. After cutting, run your finger over the end. If it feels sharp, trim it again or smooth it with a file. Some cable tie guns cut the tail flush automatically as they tighten, which gives the cleanest finish of all.
Can cable ties damage cables?
Yes, if they are pulled too tight. Over-tightening can crush the insulation, damage the copper wires inside a network cable, or break the glass fibre inside a fibre optic cable. The damage may not show up immediately, so it is worth checking the cables after you fit the tie. Pull until the bundle is snug, then stop, and never use pliers to force a tie tighter than your hands can manage.
Conclusion
Cable ties how to use them well comes down to a few habits: choose the right tie for the job, thread it with the teeth facing in, pull it snug but not crushing, trim the tail flush, and use the right material for the environment. Space the ties along the run, keep different kinds of cables apart, and use releasable ties where the bundle is likely to change. Remove old ties by cutting away from the cables, and check your work with a gentle tug and a look at the cable jackets. A cable tie is a simple tool, and simple tools reward the people who use them carefully. Fit it properly once, and the bundle will stay neat, safe, and easy to service for as long as it is needed.
If you keep a printed wiring plan or a photo of your cable runs, you can turn it into a tidy PDF for your records with our guide on how to convert PNG to PDF online, which is a useful way to keep track of a setup you may need to revisit later.